Indoor environments present unique challenges when it comes to lighting. Uneven brightness, harsh shadows, and unwanted color casts are common issues that can detract from your video’s quality. However, with the right knowledge and techniques, you can transform these challenges into opportunities for creative expression.
In this article, we’ll explore the fundamentals of indoor video lighting, from understanding light basics to mastering advanced techniques. We’ll cover essential equipment, lighting setups, and practical tips to help you achieve professional-looking results, regardless of your budget or experience level.
How Light Affects Video Quality
Before diving into specific techniques, it’s essential to grasp the fundamental properties of light that affect video quality.
Color Temperature
Color temperature refers to the warmth or coolness of light, measured in Kelvin (K). Lower temperatures (2000-3000K) produce warm, orange-yellow light, while higher temperatures (5000K and above) result in cooler, blue-tinted light. Understanding color temperature is crucial for maintaining consistent and natural-looking colors in your videos.
Light Intensity
Light intensity, or brightness, determines the exposure of your video. It’s measured in lumens or lux. Balancing light intensity across your scene is key to avoiding overexposed highlights or underexposed shadows.
Hard vs. Soft Light
The quality of light can be described as either hard or soft. Hard light creates sharp, defined shadows and high contrast, while soft light produces gentle, gradual transitions between light and shadow. Soft light is generally more flattering for subjects and easier to work with in most indoor video situations.
Natural vs. Artificial Light
Natural light from windows can provide beautiful, soft illumination but can be unpredictable and change throughout the day. Artificial light sources offer more control but may require more setup and equipment. Often, the best results come from skillfully combining both types of light.
[Insert image: Side-by-side comparison of hard and soft lighting on a subject’s face. Search for: “hard light vs soft light photography”]
Essential Lighting Equipment for Achieving Great Indoor Videos
To achieve professional-looking indoor video lighting, you’ll need some basic equipment. Here’s a rundown of the essentials:
Light Sources
- Key Light: The primary light source, usually the brightest, that illuminates the main subject.
- Fill Light: A secondary light that softens shadows created by the key light.
- Backlight: Placed behind the subject to separate them from the background and add depth.
- LED Panels: Versatile, energy-efficient lights that often allow color temperature adjustment.
- Softboxes: Diffuse light for a softer, more flattering effect.
- Ring Lights: Popular for vlogs and beauty content, providing even illumination on the subject’s face.
Modifiers and Accessories
- Light Stands: Adjustable supports for positioning lights.
- Diffusers: Soften light by spreading it over a larger area.
- Reflectors: Bounce light to fill in shadows or add highlights.
When choosing lighting equipment, consider factors like power output, color accuracy (measured by the Color Rendering Index or CRI), and portability. For beginners, a basic three-point lighting kit with LED panels is often a good starting point.
Types of Light Sources for Indoor Videos
Understanding the characteristics of different light sources will help you choose the right ones for your needs:
Incandescent Lights
These traditional bulbs produce warm light and are inexpensive but generate a lot of heat and consume more power. They’re less common in modern video production but can still be useful for creating warm, cozy atmospheres.
Fluorescent Lights
Fluorescent tubes provide soft, diffuse light and are energy-efficient. However, they can produce a slight green color cast and may flicker on camera if not properly balanced.
LED Lights
Light Emitting Diode (LED) technology has revolutionized video lighting. LEDs are energy-efficient, produce little heat, and often allow for color temperature adjustment. Many professional video lights now use LED technology.
When selecting lights, consider the Color Rendering Index (CRI). A CRI of 90 or above is ideal for accurate color reproduction in video. Also, look for lights with adjustable color temperature, which offer more flexibility in different shooting environments.
How to Get Good Lighting for Indoor Video with Three-Point Lighting Setup
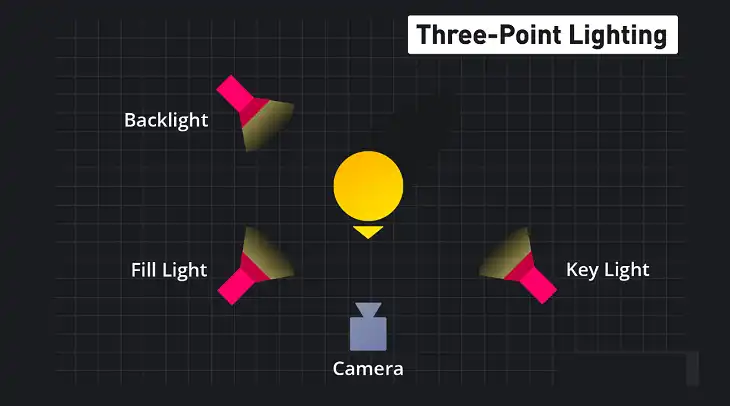
The three-point lighting technique is a fundamental approach to illuminating a subject. Here’s how to set it up:
- Key Light: Position this main light at a 45-degree angle to the subject, slightly above eye level. It should be the brightest light in your setup.
- Fill Light: Place this softer light on the opposite side of the key light, at about half the intensity. It helps to soften shadows and provide more even illumination.
- Backlight: Set this light behind and above the subject, opposite the camera. It helps separate the subject from the background and adds depth to the shot.
Experiment with the intensity and position of each light to achieve the desired effect. Remember, rules are meant to be broken – once you understand the basics, feel free to get creative with your lighting setups.
Advanced Lighting Techniques for Indoor Videos
Once you’ve mastered the basics, you can explore more advanced lighting techniques to enhance your videos:
High-Key Lighting
This technique uses bright, even lighting to create a cheerful, upbeat mood. It’s often used in commercials, sitcoms, and beauty videos. To achieve high-key lighting, use multiple soft light sources and minimize shadows.
Low-Key Lighting
Low-key lighting creates a dramatic, moody atmosphere with high contrast between light and shadow. It’s popular in film noir and horror genres. Use a strong key light and minimal fill to create deep shadows.
Practical Lights
Incorporate light sources that are visible in the frame, such as lamps or candles, to add depth and realism to your scene. These can complement your main lighting setup and help motivate the overall lighting design.
Light Painting
This creative technique involves moving lights during a long exposure to create unique visual effects. While more commonly used in photography, it can produce interesting results in video when combined with slow-motion or time-lapse techniques.
Natural Light Techniques for Indoor Videos
Harnessing natural light can produce beautiful results and save on equipment costs. Here are some tips for working with natural light indoors:
- Use windows as your main light source. North-facing windows typically provide the most consistent, soft light throughout the day.
- Diffuse harsh sunlight with sheer curtains or a diffusion panel to create softer shadows.
- Use reflectors to bounce light back onto your subject, filling in shadows and creating more even illumination.
- Control light intensity with curtains or blinds. Partially closing them can help you fine-tune the amount of light entering the room.
- Be aware of changing light conditions throughout the day. Consistency is key, so try to shoot at the same time of day for matching scenes.
Remember, natural light can be unpredictable, so always have a backup plan or some artificial lights on hand to supplement if needed.
Budget-Friendly Lighting Solutions for Indoor Videos
You don’t need expensive equipment to achieve good lighting. Here are some affordable solutions:
- Use household lamps with daylight-balanced bulbs as improvised video lights.
- Create DIY diffusers using white bed sheets or parchment paper.
- Make your own reflectors with foam core boards covered in aluminum foil or reflective insulation material.
- Repurpose clamp lights from hardware stores as affordable spot lights.
- Consider budget-friendly LED panel kits, which often include stands and basic modifiers.
Remember, creativity and understanding of light principles are more important than expensive gear.
Bottom Line
Mastering indoor video lighting is a journey of continuous learning and experimentation. While the technical aspects are important, remember that lighting is also an art form. Don’t be afraid to break the rules and develop your own style.
Key takeaways:
- Understand the basics of light quality, including color temperature and intensity.
- Start with a simple three-point lighting setup and expand from there.
- Harness natural light when possible, but be prepared with artificial lights for consistency.
- Invest in versatile, quality equipment within your budget.
- Practice regularly and analyze professional videos to improve your skills.
With patience and practice, you’ll soon be creating beautifully lit videos that captivate your audience. Remember, the best way to improve is through hands-on experience, so grab your camera and start experimenting with light today!