When it comes to capturing stunning images of the sun, using a proper solar filter is crucial. The sun’s intense rays can easily damage your camera’s sensitive sensor, and even a brief moment of direct exposure can result in permanent damage. However, with a little DIY effort, you can create your own high-quality solar filter for your camera, allowing you to safely photograph the sun and explore its mesmerizing features.
In this guide, I’ll walk you through the step-by-step process of making a solar filter for your camera, ensuring that you can safely and effectively capture the beauty of our star.
Materials You Will Need to Make a Solar Filter for Camera
A solar filter is a specialized piece of equipment that acts as a superhero for your camera (and your eyes!). Its mission? To safely block the sun’s intense light and heat, allowing you to capture stunning solar images without risking damage. It’s a great thing to have. And if you are willing to make one for yourself, then first you will need some materials first. Here’s the gear you’ll need to create your very own solar filter:
- Solar Filter Film: There are two types of solar filters: white light and hydrogen-alpha. Choose the one that suits you better. Look for a sheet of certified solar filter film, such as AstroSolar® or a similar reputable brand. These specialized films are designed to safely block most of the sun’s intense light and heat, protecting your camera and, more importantly, your eyes. You can find these at camera stores or online retailers specializing in astronomy equipment.[ Pro Tip: While you’re at it, consider grabbing an extra sheet for practice (because, hey, we all make mistakes!).]
- Cardboard: Grab some high-quality cardboard.
- Scissors or Craft Knife: For shaping your cardboard masterpiece.
- Ruler: To ensure precise measurements – after all, you don’t want a lopsided solar filter!
- Rubber Cement or Similar Adhesive: This will act as the glue to hold your creation together.
Steps for Making a Solar Filter for Camera
Now that you’ve assembled your solar filter toolkit, let’s get crafting!
- Measure Up: First things first, we need to determine the diameter of your camera lens. Grab your trusty ruler and measure the lens across its widest part. Write down this measurement – it’ll be crucial in the next step.
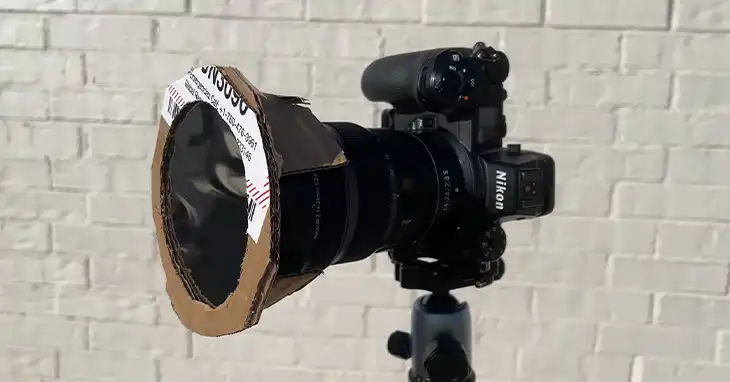
- Cardboard Creation: Here comes the fun part – building the base of your filter! Using your cardboard and ruler, cut out two circles. The larger circle should be roughly 10 centimeters wider than the lens diameter you measured earlier. This extra space will help prevent light leakage. For the smaller circle, use the exact lens diameter measurement you noted down. You can utilize a compass for perfect circles, but a steady hand and a plate or cup as a template work just fine too!
- Filter Film Finesse: Now, with the utmost care, cut a circle of your precious solar filter film. Make sure this circle is slightly smaller than the smaller cardboard circle you created. Precision is key here – a slightly smaller film is better than one that overlaps the edges.
- Assembly Time! Apply a thin, even layer of your adhesive around the outer rim of the larger cardboard circle. Carefully – and we mean carefully – position your solar filter film onto the adhesive, ensuring the reflective side faces outwards. This is the side that will block the sun’s harmful rays. Once the film is in place, gently press down the edges to secure it firmly.
- Lensification (Optional): If you have a lens hood, congratulations! This can simplify the attachment process. Many lens hoods have a filter thread that allows you to screw on your filter assembly. If you don’t have a lens hood, don’t fret! You can get creative and fashion a secure way to attach the filter to your lens without causing any damage. Remember, safety first!
Safety Precautions to be Considered
We cannot stress this enough: safety is paramount when dealing with solar filters. Here are some crucial precautions to remember:
- Never, ever look directly at the sun through your camera viewfinder, even with your DIY filter in place. Remember, these filters are designed for your camera sensor, not your eyes. Looking at the sun directly, even for a fraction of a second, can cause permanent vision damage.
- Double and triple-check your filter for any imperfections. Tiny holes or tears can compromise the filter’s effectiveness, potentially allowing harmful sunlight through. If you notice any imperfections, it’s best to discard the filter and start over.
- Solar Filters for Photography Only: Keep in mind that your DIY solar filter is designed specifically for capturing the sun through your camera lens. It is not for looking at the sun with your naked eye, even for a brief moment. Treat it like a specialized camera accessory, not a pair of sunglasses for sunbathing!
By following these steps and safety guidelines, you can create a high-quality solar filter for your camera and safely capture the beauty of the sun. Happy solar photography!
Conclusion
Making your own solar filter for your camera is a rewarding and accessible project that can open up a whole new world of solar photography. By carefully following the steps outlined in this guide and prioritizing safety, you can create a custom filter that will allow you to capture stunning images of the sun without risking damage to your camera or your eyes. Remember to always double-check your work, consult with experts if needed, and enjoy the process of exploring the captivating details of our nearest star. Happy shooting!