Moiré patterns are a common visual issue in video production, causing unwanted wavy lines, rainbow colors, and interference patterns in footage. This phenomenon occurs when fine, repeating details in a scene interact with the camera’s sensor or lens, producing visually distracting patterns that degrade the quality of the final video.
In simple terms, moiré is an artifact that often appears when capturing subjects with intricate textures, like fabrics, grids, or architectural details. Understanding and addressing moiré is crucial for maintaining professional-quality video content, as these patterns can make the footage look unpolished and amateurish. Here we’ll discuss the root causes of moiré, provide strategies for minimizing it during filming, and explore various post-production techniques to correct it.
What is A Moiré Pattern?
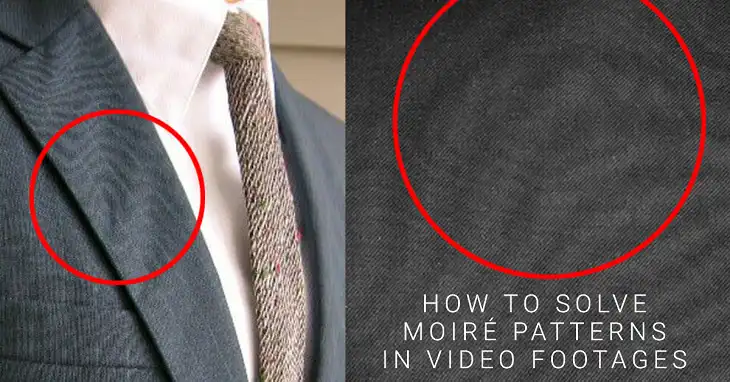
Moiré is a visual artifact that manifests as strange, wavy patterns or rainbow-like colors. This effect is primarily caused by two overlapping patterns with different frequencies. In video production, the most common culprit is the interaction between fine details in the scene, such as textiles or architectural elements, and the camera sensor’s pixel grid.
For example, imagine filming a person wearing a tightly woven shirt. The fabric’s pattern has its own frequency, and when it aligns with the pixel grid of the camera sensor, the overlapping frequencies produce unwanted artifacts. These patterns become especially pronounced when shooting with high-resolution cameras or using lenses with high sharpness.
Why is Moiré a Problem?
Moiré patterns can significantly impact the visual quality of video footage, distracting viewers from the main subject and reducing the professional appearance of a shot. They are especially problematic in scenarios where clarity and detail are crucial, such as product videos, fashion shoots, or architectural footage. Furthermore, removing moiré in post-production can be time-consuming and sometimes impossible without sacrificing overall image quality.
In a commercial setting, footage affected by moiré might require reshooting, which can lead to increased production costs and delayed project timelines. Therefore, understanding and addressing moiré patterns during filming is essential for videographers, especially those working on high-end projects.
What Are the Root Causes of Moiré Patterns
Interference of Patterns
Moiré patterns are created when the details in a scene, like fabric textures, intersect with the pixel grid of the camera sensor in a way that causes frequency overlap. This interference creates unwanted visual artifacts. The problem is more noticeable in digital sensors because of their regular pixel grid structure, which can easily align with repeating patterns in the scene.
For example, a camera sensor with a resolution of 1080p has a fixed grid of 1920 x 1080 pixels. When a subject, like a tightly woven fabric, has a pattern that closely matches this grid, moiré patterns will appear. This effect can be even more pronounced with higher resolution cameras, such as 4K or 8K, because they capture finer details, increasing the likelihood of pattern interference.
Camera Settings and Equipment Factors
Several factors in camera settings and equipment can contribute to the creation of moiré patterns:
- Resolution and Sensor Type: Cameras with higher resolution sensors, such as 4K or 8K, are more prone to moiré because they capture more detail, which increases the chances of frequency overlap. Some sensors, like the Fujifilm X-Trans CMOS, are designed to minimize moiré through a unique pixel arrangement.
- Shutter Speed: Moiré can be affected by shutter speed because it interacts with the way the camera captures frames. For example, faster shutter speeds can sometimes amplify the interference patterns due to reduced motion blur, making moiré more visible.
- Aperture and Lens Choice: Lenses with high sharpness can accentuate the fine details in a scene, making moiré more likely. Using a softer lens or slightly defocusing the image can sometimes mitigate this issue.
Preventing Moiré Patterns During Filming
Pre-Production Planning
Before starting a shoot, it’s essential to identify potential moiré-causing elements in your scene. For instance, certain fabrics, like silk or tweed, or architectural patterns, like brick walls and metal grilles, are notorious for causing moiré. If such patterns are unavoidable, consider modifying the wardrobe, props, or background to eliminate the risk.
Camera Adjustments to Minimize Moiré
Adjusting the camera settings can significantly reduce the chances of moiré appearing. Changing the shooting distance or angle can alter the alignment of patterns, disrupting the interference and minimizing moiré. Additionally, slightly defocusing the lens can help blur the fine details enough to prevent the interaction with the camera sensor.
Another technique is to use a camera equipped with an anti-aliasing filter. Anti-aliasing (or optical low-pass) filters work by slightly blurring the high-frequency details before they reach the sensor, preventing moiré. However, these filters can also reduce overall sharpness, so they are not always suitable for every type of footage.
Using the Right Equipment
When choosing a camera, look for models with advanced sensor technology designed to minimize moiré. Cameras like the Fujifilm X-T4, which uses an X-Trans sensor, or the Sony Alpha series, which employs BSI (Backside Illuminated) sensors, are less prone to moiré due to their unique pixel arrangements.
Post-Production Solutions for Correcting Moiré Effect
If moiré appears in your footage despite best efforts, there are several post-production techniques to address it.
Software Tools for Moiré Removal
Many video editing programs have built-in tools for moiré reduction. For example, Adobe Premiere Pro and DaVinci Resolve offer moiré reduction features that allow you to target specific areas of the footage and reduce the patterns through selective blurring or color correction.
For more severe cases, frequency separation techniques can be used. This approach involves separating the image into high and low-frequency layers, allowing you to isolate and correct the moiré without affecting other details in the frame.
Manual Techniques: Blurring, Color Correction, and Masking
In some cases, selective blurring or color correction can help reduce the visibility of moiré. This approach is particularly effective when moiré appears in specific areas of the frame, such as on a shirt collar or along a building’s edge. By applying a soft blur to these areas, you can reduce the interference without affecting the overall sharpness of the image.
Advanced Techniques for Stubborn Moiré Patterns
For particularly stubborn moiré patterns, more advanced techniques like frequency domain processing or neural network-based solutions can be employed. These techniques are highly specialized and often require professional-grade software and expertise.
One effective approach is to use frequency domain processing to isolate and remove specific frequencies in the image. This method allows for precise control over the removal process, making it ideal for complex moiré patterns that don’t respond to standard corrections.